How to create usergroup in hybris | step by step to create usergroups in Hybris | beginners hybris developer

Users are different types of people that access your store whether it be an administrator, customer, or shopper. Users can be assigned to Groups
Groups within Hybris commerce are a simple way to organize your users, or customers. Yet, the feature is powerful and versatile, and it can be used to further extend your offerings to select groups of users. Members of an administrative group may have the rights to manage all, or part of your store. Additionally, non-admin group members can be given special pricing, payment methods, shipping options, taxation, subscriptions, and more.
Below steps you follow to create usergroup in hybris
1.       Hmc  > User > User Groups


In above there is various type of user group  that available like B2B usergroup  in hybris and you can create
2.         
Now you fill all details in above and click on create button

3.       You can also apply personalization for your usergroup in Personalization tab as below


How to configure Jenkins with with Git Hub for linux /windows enviornment - Hybris build process

Hello Friends,

As you already know Jenkins is a software use for continuous integration. Jenkins will be installed on a server where the central build will take place.

Also you know about GIT hub which is use for repository

From project point of view it is very important to know how Jenkins used with Git hub so lets discuss about.
Today will explain how to integrate Jenkins in Linux with private GIT Hub.

After install Jenkins you need to configure so please follow below steps

Note: below configuration given for Linux/Unix environment. If your environment is window then just open what graphical image given and then configure


1.     Configuring the GIT plugin in Jenkins:

Jenkins à Manage Jenkins à Manage Plugins
Make sure Jenkins GIT Client Plugin and Jenkins GIT plugins are installed.


2.     Configure GIT in server (if it is install on Linux enviornment):

Login to Jenkins server via puty
Execute the following command - sudo yum install git-all


3.     Configure GIT executable path:

Jenkins àMange JenkinsàConfigure System
Enter the git executable path(git installed to the server in previous step)
My case the path is /usr/bin/git, change accordingly


4.     SSH Configuration:

Login to Jenkins server via putty
Execute the following commad - sudo -u jenkins ssh-keygen -t rsa
Enter the details accordingly, Passphrase is optional if required then enter some string.
This will create private and public keys under /var/lib/jenkins/.ssh (default files are id_rsa and id_rsa.pub)

5.     Configuring Credential:
Login to Jenkins console --> Jenkins Credentials
Click on add a domain – Enter some name(better git hub host name)
Click on Add credential
Enter the user name as Jenkins(the user that runs the jenkins)
Select From the Jenkins master ~/.ssh


6.     Configure deployment key in GIT:

Login to GIT and click on Profile Settings
Click on SSH Keys – Enter the content of id_rsa.pub(cat id_rsa.pub) to Key filed
Click on add key.


7.     Configure the Job:

Configure the GIT URL and select the credential name created in the previous step
Specify the branch to be build.


Explain Performance Tuning of Hybris Platform must know for hybris Architect / Solution Architect

Hello Friends,
Lets today discuss about hybris performance related things which can very usefull when you are going for Hybris interview for senior position like Architect / hybris solution architect
So below point you must be know

1. Enable JMX Remote monitoring:
Remote JMX monitoring will help us to monitor the server resources (e.g. memory usage and CPU usage) through JMX client such as VisualVM.
Open <<HYBRIS_HOME>>/conf/local.properties and make sure the following properties are added as part of tomcat.generaloptions .
-Dcom.sun.management.jmxremote.port=50055 -Dcom.sun.management.jmxremote.authenticate=false -Dcom.sun.management.jmxremote.ssl=false -


Memory usage also can be monitored from admin console
Monitoring à Memory


2. JVM Tuning:
The default JVM parameters are not optimal for running large applications. So the parameters (e.g. memory and GC) should be tuned for optimal performance of the application.
Create a folder crash under <<HYBRIS_HOME>>
Open <<HYBRIS_HOME>>/conf/local.properties and replace the variable java.mem with the java.mem=6G
Open <<HYBRIS_HOME>>/conf/local.properties replace tomcat.generaloptions with the following data
tomcat.generaloptions=-Xmx6G -Xms6G -XX:MaxPermSize=1G -XX:NewRatio=1 -XX:SurvivorRatio=12 -XX:+UseParallelGC -XX:+UseParallelOldGC -XX:ParallelGCThreads=8 -XX:+HeapDumpOnOutOfMemoryError -XX:HeapDumpPath=/app/hybris/crash/hybris_java.hprof -Xloggc:/app/hybris/crash/hybris_gc.log -XX:+PrintGCDetails -XX:+PrintGCTimeStamps -XX:+PrintGCDateStamps -XX:+PrintHeapAtGC -ea -Dcom.sun.management.jmxremote.port=50055 -Dcom.sun.management.jmxremote.authenticate=false -Dcom.sun.management.jmxremote.ssl=false -Dorg.tanukisoftware.wrapper.WrapperManager.mbean=true -Djava.endorsed.dirs="%CATALINA_HOME%/lib/endorsed" -Dcatalina.base=%CATALINA_BASE% -Dcatalina.home=%CATALINA_HOME% -Dfile.encoding=UTF-8 -Dlog4j.configuration=log4j_init_tomcat.properties -Djava.util.logging.config.file=jdk_logging.properties -Djava.io.tmpdir="${HYBRIS_TEMP_DIR}" ${jvm.crashHack}
Change the XX:HeapDumpPath and –Xloggc path accordingly

a. Apply the required load to the system – Apache JMeter can be used to load the request to the system.
b.  Monitor the system resources like CPU, Memory and threads using VisualVM while load is applied to the system
c.Change the memory parameters and GC parameters based on the above test result.

If you provide too little memory to an application it will run out of memory. The JVM will not be able to free up memory space at the rate that your application needs it. In this scenario JVM will throw an OutOfMemoryError and shut down completely
The above three steps should be repeated to achieve the optimum system performance by applying different values for the parameters.
3. Thread Tuning:
Modify the thread parameters based on the system performance.
Open <<HYBRIS_HOME>>/bin/platform/ project.properties and replace the following property values.
tomcat.acceptcount=150
tomcat.maxthreads=300
Change the counts accordingly.
Open <<HYBRIS_HOME>>/ config/tomcat/conf/server.xml
And replace the below content
Old
<Connector port="${tomcat.http.port}"
maxHttpHeaderSize="8192"
maxThreads="${tomcat.maxthreads}"
protocol="org.apache.coyote.http11.Http11Protocol"
executor="hybrisExecutor"
enableLookups="false"
acceptCount="100"
connectionTimeout="20000"
URIEncoding="UTF-8"
disableUploadTimeout="true" />
New
<Connector port="${tomcat.http.port}"
maxHttpHeaderSize="8192"
maxThreads="${tomcat.maxthreads}"
protocol="org.apache.coyote.http11.Http11Protocol"
executor="hybrisExecutor"
enableLookups="false"
acceptCount="150"
connectionTimeout="20000"
URIEncoding="UTF-8"
disableUploadTimeout="true" />
Change the acceptCount="150" accordingly

4. Improve Caching:
Open <<HYBRIS_HOME>>/ bin/platform/project.properties
Replace cache.main property value with cache.main=50000

5. Thread Dumps:
Thread Dump is a snapshot taken at a given time which provides with a complete listing of all created Java Threads. The thread dump can be analyzed to determine the bottleneck or blocking threads.
Different tools can be used to analyze the thread dumps e.g. Samurai and IBM Thread and Monitor Dump Analyzer for Java.
Thread Dump can be generated from admin console
Monitoring à Thread Dump


Click on Download button to download the current thread dump.

6. JDBC Logging:
Sometimes the application will be very slow due to slow running queries. Analyzing the slower running queries using JDBC logging and create the indexes wherever required can drastically improve performance.
Monitoring à Database à JDBC logging


Click on Start logging and click on Stop logging after particular time.
Click on Download log

Click on JDBC log analysis à Analyze to find out the details on the queries executed

Core concept of deployment table in itemtype in hybris | use of build.development.mode=true in hybris

 Hello Friends,

Let’s discuss about deployment table definition in items means what is deployment and why should give, when it is mandatory , In which case you should not give deployment table.

So

1. What is deployment

 > Process of defining the table for the item type in items.xml is called deployment means specify the table name while defining the item type so that the values
 of the item type will be persisted in that table like below

  <itemtype code="EveryreplyCustomer" generate="true" autocreate="true" jaloclass="de.hybris.platform.acceleratorcms.jalo.components.EveryreplyCustomer">
      <description>It represents everyreply Customer.</description>
    <deployment table="EveryreplyCustomer" typecode="31003" />
  </itemtype>
 
 2. Now when it is mandatory to give deployment table it items definition

 > Before going to dicsuss i think below point you already know
   a. If the item type is not extending any item type then by default GenericItem will be considered as the parent of the item type.so the deployment ofGenericItem will be used by the item type.
   b. If we don’t specify the deployment for any of our item type then deployment specified in the closest type in the hierarchy will be considered.
  
  
Now before going to next lets discuss about   build.development.mode=true
so above is one of legacy mode which tell  "Build process checks the missing deployments"
               
 A.  So if build.development.mode=true in local.properties file then Build process checks the missing deployments
   a. If you define a itemtype B which extends a itemtype A and itemtype A has no deployment table then BUILD will FAIL
  
    <itemtype code="itemTypeA" generate="true" autocreate="true" jaloclass="de.hybris.platform.acceleratorcms.jalo.components.itemTypeA">
    </itemtype>
 
      <itemtype code="itemTypeB" generate="true" autocreate="true" extends="itemTypeA" jaloclass="de.hybris.platform.acceleratorcms.jalo.components.itemTypeA">
    </itemtype>
  
  
    But after given deployment table in itemtypeA then build will success
               
    Now again
               
                Test your knowledge with below
               
                <itemtype code="ItemTypeA" generate="true" autocreate="true"  jaloclass="de.hybris.platform.acceleratorcms.jalo.components.ItemTypeA">
                <description>It represents ItemTypeA.</description>
                <attributes>
                <attribute qualifier="myCustCustomerId1" type="java.lang.String" generate="true" autocreate="true">
                                <persistence type="property" />
                                <description>It is localized customerId of the everyreply user.</description>
                </attribute>
                </attributes>
                </itemtype>
                 will above throw build error?
                 
                 No, above will not throw build error
                 
    Again
                 
                 <itemtype code="ItemTypeA" generate="true" autocreate="true" extends="GenericItem" jaloclass="de.hybris.platform.acceleratorcms.jalo.components.ItemTypeA">
                <description>It represents ItemTypeA.</description>
                <attributes>
                <attribute qualifier="myCustCustomerId1" type="java.lang.String" generate="true" autocreate="true">
                <persistence type="property" />
                <description>It is localized customerId of the everyreply user.</description>
                </attribute>
                </attributes>
                </itemtype>

              will above throw build error?
               
                Yes , above will throw build error and you must be define deployment table. so after giving extends="GenericItem" rules will also apply here.
               
               
Again
               
                <itemtype code="ItemTypeA" generate="true" autocreate="true" extends="GenericItem" jaloclass="de.hybris.platform.acceleratorcms.jalo.components.ItemTypeA" abstract="true">
                <description>It represents ItemTypeA.</description>
                <attributes>
             <attribute qualifier="myCustCustomerId1" type="java.lang.String" generate="true" autocreate="true">
                <persistence type="property" />
                <description>It is localized customerId of the everyreply user.</description>
                </attribute>
                </attributes>
                </itemtype>
               
                will above throw build error ?
                 
                 No, In case abstract="true" there is no require to give deployment table while build.development.mode=true

               
B. if build.development.mode=false in local.properties file then Build process will not checks the missing deployments               


Hybris recommend

1. It is not recommend to build.development.mode=false because in this case there will storing many item types in GenericItem table will decrease the performance and possibility of data truncation due to columns limit in the table.
2. Deployment table should not be defined for any Item type if there is already a deployment defined for its super type otherwise it will decrease the performance as it has to perform multiple joins while retrieving.
                

Core concept of Atmoic type in Hybris. How to create Your own Atomic type in Hybris ?

Hello Friends 

If you are entry level in hybris, then you must have knowledge of some very basic of hybris type i.e. Atomic Type 

Some time interviewer ask question related atmic type in hybris like

what is atomic type in hybris?

How you can create your own atomic type in hybris ? if possible to create.


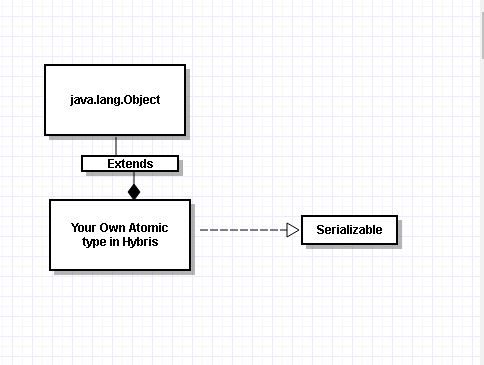
So Atomic type is most basic type in hybris which representation of java.lang.Number and java.lang.Object  like below

 <atomictype class="java.lang.Number" extends="java.lang.Object" autocreate="true" generate="false"/> 
 <atomictype class="java.lang.String" extends="java.lang.Object" autocreate="true" generate="false"/>

 Above already define atomic type in hybris

 If you want to create your own Atomic type in hybris then you have follow below steps like EveryReplyAtomicType then


 1. Create class EveryReplyAtomicType.java

 2. Then your class must have to implements Serializable interface

 Now define it define in your *.items.xml file as below

 <atomictype class="src.every.EveryReplyAtomicType.java" extends="java.lang.Object" autocreate="true" generate="false"/> 

 You can see in above declaration there in no code attribute to set the unique identifier. Instead, the AtomicType's class attribute is used as its reference.

 Your class

 EveryReplyAtomicType implements Serializable {

 }

How to customize access rights for hmc user's login in hybris | step by step to create type access rights to hmc logged user

There was requirement related hmc login where for some user only can do limited work means only see user’s related work  like create employee , company etc

Means it related to accrees rights of hmc logged in user

You allready know that when you are logging through admin means admin and password nimda you can see all hmc rights as below screen shot


Because admin user is part of admin group so admin is able to see all hmc rights

If you create any user and will part of admin group that can see all.

But in my requirement where user can see some user’s related work  like create employee , company etc

So below step you can do

1.       Create user group everyreply_usergroup


2.       After create user group - everyreply_usergroup go to Access Rights tab


Now add object


Search customer identifier – basically every thing is item type so you can search on which type you want give rights to this group


After add you can see below access rights where you can see read, change, create, delete so what rights you want to for this type , can give to this group so you need to just checked as below


Then finally save it
3.       Now create employee like as below


With password


Now assign it to user group that you have created - everyreply_usergroup as below


4.       Now you can login with these employee userid and password then you can your hmc only given type access rights can see in your hmc as below


Note- you can do everything above by using impEx


What is Node in Bussiness Process and How many type of Node in Bussiness Process in Hybris

Good Evening Friends,

In my last Hybris interview i got question about Bussiness Process in Hybris and question was "What is Node in Bussiness Process and How many type of Node in Bussiness Process"

Related to what is Bussiness process which i allready discuss so lets discuss about type of Nodes in bussiness process

So what is Node?

After define process in hybris (through XML ) as below

<?xml version="1.0"encoding="utf-8"?>
<process xmlns="http://www.hybris.de/xsd/processdefinition" name="everyReplyProcess"
start="everyReplyStart" onError="onError" processClass="de.hybris.platform.fulfilment.model.ConsignmentProcessModel">
... ...
</process>


Then there is must to add content in process and that content is steps of your process and each step is called Node of process and each Node has tell below
1. Which node has to be invoked next
2. Each Node has ID

In above process definition there is one declare Node that is start node of your process in above case everyReplyStart is declare node


In hybris there is below type of Node and there use

1. Action Node  - Actions are the most important part of the processengine functionality. Normally, they have to implement a logic or call specialized services to execute tasks that are necessary in a process

example

<action id="isEveryReplyProcessCompleted" bean="bprocessesCompleted">       
  <transition name="OK"to="sendNotification"/>       
  <transition name="NOK"to="waitForComplete"/>
</action>


2. Wait Node - Lets during process you need to communicate to external environment or need to wait for complete of subprocess (inside process you can also define subprocess) then we need to define wait node as below

<wait id="waitForEverReplySubprocessEnd" then="isProcessCompleted"> <event>EverReplySubprocessEnd</event>
</wait>

so after wait complete which sense by your event given above call Node ID - isProcessCompleted

3. Split Node -  Suppose during in process you want to execute Actions in parallel then you can do by Split node as below

<split id="splitNode">
  <targetNode name="node1"/> <targetNode name="node2"/>
</split>

4. Notify Node - Lets during process execution you want to notify about status of process to someone then you define Notify Node in process as below

<notify id="notifySomeOne"then="nextNodeID">
  <userGroup name="everyReplyGroup"message="Perform action"/>
</notify>

5. End Node - it is ends the process and stores state and message in a process

<end id="error" state="ERROR">All went wrong.</end>
<end id="success" state="SUCCEEDED">Everything was fine</end>